
Why Your Vibe Coded App Emails Go to Spam
This is the One Thing Replit Agent Can't Fix Without You
The Problem:
You built an amazing app in Replit. The authentication works perfectly. Password resets work. Email verification works. Everything functions exactly as designed.
But...
Every single email your app sends goes straight to the spam folder. Your users never see their verification emails. Password resets get lost. Welcome emails disappear. Your app looks broken even though it's not.
Why? Because you're missing email authentication (DMARC, DKIM, and SPF). And Replit Agent can't fix this for you, you have to do it yourself.
What You'll Learn
Why your emails go to spam (even when everything works)
What DMARC, DKIM, and SPF actually mean (in plain English)
How to check if you have email authentication set up
Step-by-step guide to fixing it
How to verify your emails will reach the inbox
The Harsh Reality of Email Delivery
Here's what happens when you build an app with Replit or any other vibe-coding tool and add email features:
You: "Add user registration with email verification"
Replit Agent: [Builds registration system, integrates Resend/SendGrid/Mailgun, sends verification emails]
You: "Perfect! Let me test it..."
[You register with your Gmail account]
Your inbox: [Empty]
Your spam folder: "Please verify your email address"
You: "Why is this in spam?!"
This happens to 99.99% of vibe coders. And it's not the Vibe-Coding platform’s fault. It's not Resend (or similar) fault. It's not even your fault for not knowing.
The problem? You're sending emails from a domain (like resend.com, sendgrid.net, or mailgun.org) that you don't own, without proper authentication.
Email providers like Gmail, Outlook, and Yahoo see this as suspicious. They assume you're a spammer. Straight to junk.
Why This Happens
The Email Authentication Problem Explained Simply
Imagine you get a letter in the mail that says:
Return Address: The White House, Washington DC
Message: "Dear Citizen K, please send $500 to this address..."
Would you trust it? Of course not! Anyone can write "The White House" on an envelope.
That's exactly what happens with emails. Your app says "This email is from support@yourapp.com" but there's no proof that you actually own yourapp.com or that you're authorized to send emails from it.
Email authentication (SPF, DKIM, DMARC) is the digital equivalent of:
A government-issued ID proving you are who you say you are
An official stamp proving the letter wasn't tampered with
A written policy explaining what to do with suspicious mail
Without these, Gmail/Outlook/Yahoo (and other mailbox providers) treat your emails like a suspicious letter with no proof of origin.
The Three Email Authentication Methods
Don't panic! You don't need to memorize these. You just need to set them up once. Think of them as three digital ID cards that prove your emails are legit:
1. SPF (Sender Policy Framework)
What it does: Creates a list of servers/services allowed to send emails on behalf of your domain.
Plain English: "These are the only mail carriers authorized to deliver mail with my return address on it."
Example SPF Record:
v=spf1 include:resend.com ~all
Translation: "Resend is allowed to send emails from my domain. If an email claims to be from my domain but doesn't come from Resend, it's probably spam."
2. DKIM (DomainKeys Identified Mail)
What it does: Adds a digital signature to your emails proving they haven't been tampered with.
Plain English: "This letter has an official wax seal. If the seal is broken, someone messed with the letter."
How it works:
Your email service (Resend, SendGrid, Mailgun, etc.) signs each email with a private key
You publish the public key in your DNS records
Gmail/Outlook checks the signature using your public key
If it matches, the email is authentic and unmodified
DMARC (Domain-based Message Authentication, Reporting & Conformance)
What it does: Tells email providers what to do if SPF or DKIM fails.
Plain English: "If someone sends a letter with my return address but it's not authenticated, here's what I want you to do with it."
Example DMARC Record:
v=DMARC1; p=quarantine; rua=mailto:dmarc@your_email.com
Translation: "If an email fails authentication, put it in the spam folder. Also, send me reports about failed emails so I can investigate."
Policy Options:
p=none - Do nothing (just monitor and report)
p=quarantine - Send to spam if authentication fails
p=reject - Reject the email completely if authentication fails
How to Check If You Have Email Authentication
Before fixing anything, let's see if you already have it set up:
Method 1: Send a Test Email and Check Headers
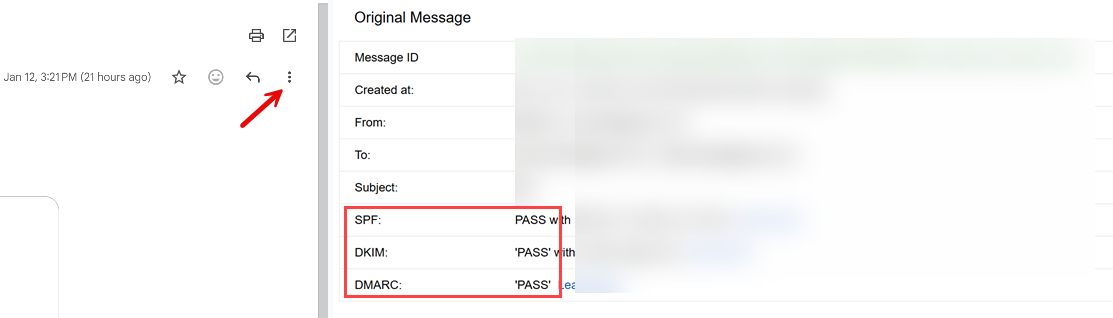
Step 1: Send a test email from your app to your Gmail account.
Step 2: Open the email in Gmail
Step 3: Click the three dots (⋮) then "Show original"
Step 4: Look for these lines:
SPF: PASS
DKIM: PASS
DMARC: PASS
If you see "FAIL" or "NONE" for any of these, You need to fix it if you’re sending emails from that domain!
IMPORTANT - don’t use “test” in the subject. Instead, draft your test email with a meaningful subject and content to avoid AI content filtering, which could still place you in the SPAM folder.
Method 2: Use an Online Tool
Quick Check Tools:
MXToolbox: mxtoolbox.com/SuperTool.aspx
DMARCIAN Domain Checker: https://dmarcian.com/domain-checker/ (one of my go-tos)
Google Admin Toolbox: toolbox.googleapps.com/apps/checkmx/
EasyDMARC: https://easydmarc.com/tools/dmarc-lookup (one of my go-tos)
Mail-Tester: mail-tester.com
How to use Mail-Tester:
Go to mail-tester.com
Copy the test email address they give you
Send an email from your app to that address (make sure the email does not contain any PII (Personally Identifiable Information) or secrets
Check your score (aim for 10/10)
Review what's failing (SPF, DKIM, DMARC)
If you send from Outlook, you may see an orange warning regarding policy state, you can ignore those.
How to Fix Email Authentication
Before You Start:
You'll need:
A domain you own (yourapp.com, etc.) - If you don't have one, get one from GoDaddy or Replit for ~$10/year
Access to your domain's DNS settings (through Cloudflare, GoDaddy, Replit etc.)
An account with an email service (Resend, SendGrid, Mailgun, or AWS SES)
The fix depends on which email service you're using. Click yours below:
Option 1: Using Resend (Easiest for Beginners imho)
Prerequisites:
You own a domain (yourapp.com etc.)
You have access to your domain's DNS settings
You have a Resend account (free at resend.com)
Step-by-Step:
1. Add Your Domain in Resend:
Login to resend.com
Click Add Domain
Enter your domain (e.g., yourapp.com)…I like my transaction emails, coming from the app, to have dispatch.yourapp.com in the FROM.
Click Add
2. Resend Shows You DNS Records to Add:
You'll see records like this:
SPF Record (TXT):
Type: TXT
Name: send.dispatch (or whatever subdomain Resend shows)
Value: v=spf1 include:amazonses.com ~all
MX Record (for bounce handling):
Type: MX
Name: send.dispatch (or whatever subdomain Resend shows)
Value: feedback-smtp.us-east-1.amazonses.com
Priority: 10
DKIM Records (CNAME - usually 3 records):
Resend will show you 3 CNAME records with cryptographic values
They look like: xxxxx._domainkey.send.dispatch.yourapp.com
Copy each one exactly as shown
Note: Resend uses AWS SES infrastructure, so your records will reference amazonses.com
3. Add Records to Your DNS Provider:
If you purchased the domain from Replit, go to Publishing > Domains and enter the values you copied from Resend.
Important Note: Resend typically uses a subdomain like send.dispatch.yourapp.com for sending. This means your emails will come from support@send.dispatch.yourapp.com. This is normal and actually recommended for transactional emails!
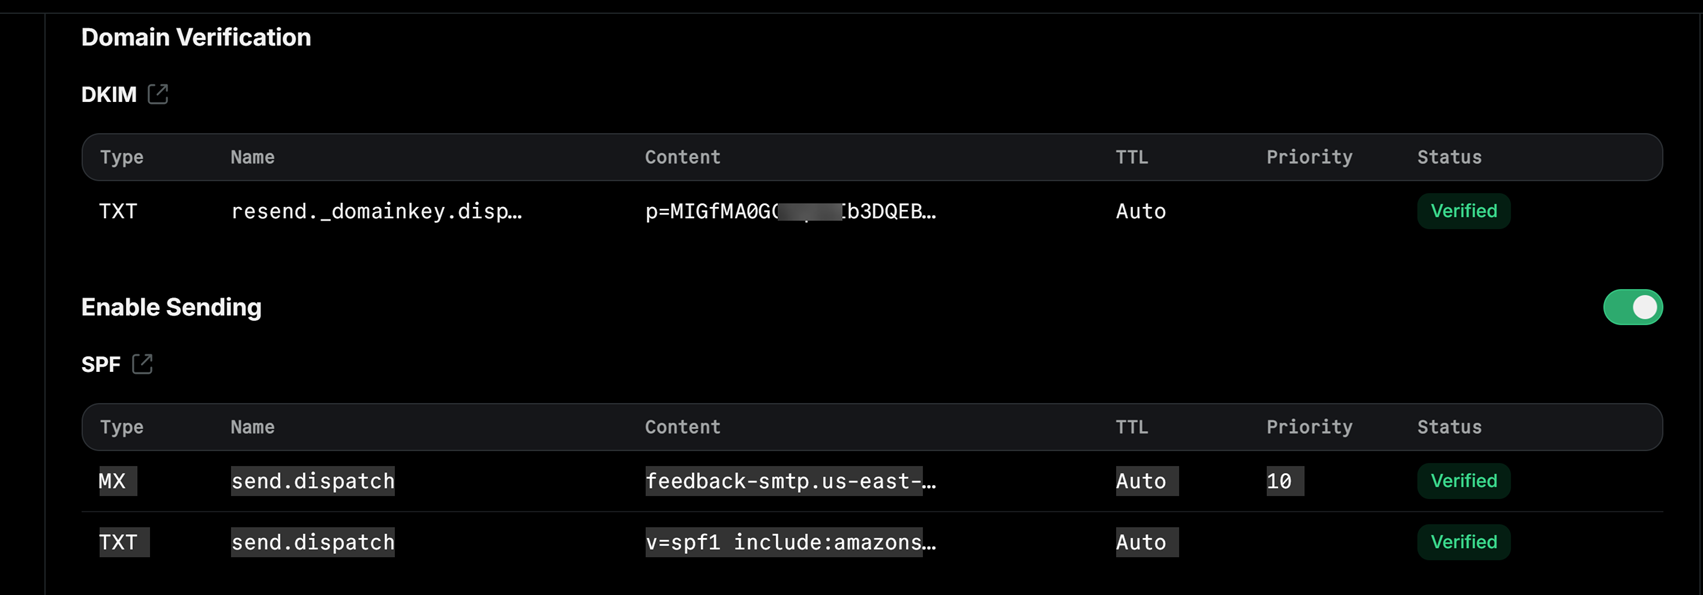
This is what it should look like in Resend

This is what it should look like in Replit > Publishing > Domains
If using GoDaddy:
Login to GoDaddy
Go to My Products > Domains
Click DNS next to your domain
Click Add for each record type
Enter records exactly as Resend shows
Save
4. Verify in Resend:
Go back to Resend Domains
Click Verify Records
Wait 5-10 minutes (DNS can be slow)
Click Verify again
Once verified, you'll see green checkmarks
VERY IMPORTANT: There will be times where you will want to send marketing and business emails from your Outlook using the same domain. In such cases, you have to also copy over the SFP and DKIM records. If you’re using GoDaddy, they will provide the records after setting up the Outlook account. Get the Outlook DKIM from the Microsoft 365 Defender portal. Sign in with with an admin account and navigate to Email & collaboration > Policies & rules > Threat policies > Email authentication and get your DKIM from there.
As for DMARC, if one is not present in your DNS, add it: _dmarc v=DMARC1; p=none; sp=reject; pct=100;
Start with p=none to monitor, then switch to p=quarantine after testing.
This is what an app DNS records should look like in Replit (in this case, it’s also using Resend for trax emails and GoDaddy for Outlook)
TXT _dmarc v=DMARC1; p=reject; sp=reject; pct=100;
TXT @ MS=ms87677777…this one proves ownership for Microsoft services…in this case Im using Outlook
TXT @ v=spf1 include:secureserver.net -all
CNAME autodiscoverautodiscover.outlook.com
CNAME emailemail.secureserver.net
MX @ myapp-com.mail.protection.outlook.com
MX send.dispatchfeedback-smtp.us-east-1.amazonses.com
TXT send.dispatchv=spf1 include:amazonses.com~all
TXT resend._domainkey.dispatchp=MIGfMA0GCSqGSIb3DQEBAQUAA4GNAD…
CNAME selector1._domainkeyselector1-myapp-com._domainkey.netorg19830.w-v1.dkim.mail.microsoft
CNAME selector2._domainkeyselector2-myapp-com._domainkey.netorg19830.w-v1.dkim.mail.microsoft
Test Your Emails:
Send a test email from your app
Check that it arrives in inbox (not spam!)
Open the email > Click ⋮ > "Show original"
Verify: SPF: PASS, DKIM: PASS, DMARC: PASS
Option 2: Using SendGrid
Step-by-Step:
1. Domain Authentication in SendGrid:
Login to SendGrid
Go to Settings > Sender Authentication
Click Authenticate Your Domain
Enter your domain (e.g., yourapp.com)
Choose your DNS host (Cloudflare, GoDaddy, etc.)
Click Next
2. SendGrid gives you DNS records to add:
You'll see something like this:
CNAME Records (for DKIM):
s1._domainkey.yourapp.com → s1.domainkey.u123456.wl.sendgrid.net
s2._domainkey.yourapp.com → s2.domainkey.u123456.wl.sendgrid.net
TXT Record (for SPF - might already exist):
yourapp.com → v=spf1 include:sendgrid.net ~all
3. Add these records to your DNS provider:
If using Cloudflare (at the time of writing this, CF is easier to config if the domain was purchased outside of Replit) :
Login to Cloudflare
Select your domain
Go to DNS > Records
Click Add record
Type: CNAME
Name:
s1._domainkeyTarget:
s1.domainkey.u123456.wl.sendgrid.net(from SendGrid)Proxy status: DNS only (gray cloud)
Click Save
Repeat for
s2._domainkey
If using GoDaddy:
Login to your registrar
Find DNS settings for your domain
Add the CNAME records exactly as SendGrid shows
Save changes
4. Verify in SendGrid:
Go back to SendGrid
Click Verify
Wait 24-48 hours for DNS to propagate (usually much faster)
Click Verify again
Once verified, you'll see green checkmarks
5. Set up DMARC:
Add a TXT record in your DNS:
Type: TXT
Name: _dmarc
Value: v=DMARC1; p=none; rua=mailto:dmarc@yourapp.com
Start with p=none to monitor, then switch to p=quarantine after testing.
Testing Your Email Authentication
Test 1: Send Email to Gmail
Send a test email from your app to your Gmail
Check if it lands in inbox (not spam!)
Open the email
Click ⋮ > "Show original"
Verify all three pass:
SPF: PASS
DKIM: PASS
DMARC: PASS
Test 2: Use Mail-Tester (and the tools I listed at the top)
Go to mail-tester.com
Copy the test email address
Send from your app to that address….type a well formatted email with proper content and not SUBJECT: “test”, BODY “test” No PII details!!!!
Check your score
Goal: 10/10 or at least 9/10
Common issues if score is low:
SPF not set up → Add SPF record
DKIM not set up → Add DKIM records
DMARC missing → Add DMARC record
Blacklisted IP → Contact your email service
Missing unsubscribe link → Add to your emails
Test 3: Send to Multiple Email Providers
Test with accounts on:
Gmail
Outlook
Yahoo
Proton (for the techies)
Your company email (if using corporate email)
All should land in inbox, not spam!…in some cases Gmail may land you in spam the first week, until your IP gains reputation. Keep sending formatted emails to Gmail accounts.
Common Issues & Solutions
Issue #1: DNS Records Not Verifying
Symptoms: Added records but SendGrid/Mailgun says "Not verified"
Solution:
Wait 24-48 hours for DNS propagation
Double-check you entered records exactly as shown (no typos)
Make sure you added records to the RIGHT domain (not a subdomain)
If using Cloudflare, set CNAME records to "DNS only" (not proxied)
Issue #2: Emails Still Going to Spam
Symptoms: SPF/DKIM/DMARC all pass but emails still in spam
Solution:
Check your email content (avoid spam trigger words: "free", "click here", excessive caps)…well formatted email content.
Make sure you're not sending too many emails too quickly (rate limiting)
Add an unsubscribe link if they’re not transactional emails (required by Gmail)
Verify your IP isn't blacklisted (check with MXToolbox)
Build sender reputation slowly (start with small volumes)
Issue #3: SPF Includes Multiple Services
Symptoms: You use SendGrid AND another service, SPF record conflicts
Solution:
Combine them in one SPF record:
v=spf1 include:sendgrid.net include:_spf.google.com ~all
Note: SPF has a limit of 10 DNS lookups. Use SPF flattening tools if you exceed this.
Issue #4: DMARC Reports Showing Failures
Symptoms: Getting DMARC reports with failed authentication
Solution:
Review which emails are failing (might be forwarded emails)
Check if you have multiple services sending emails (all need authentication)
Verify SPF and DKIM are correctly set up
Start with
p=noneto monitor before enforcing
Email Authentication Deployment Checklist
Use this checklist before deploying your app to ensure emails land in inbox, not spam.
Domain Setup
- Own a domain
- Have access to DNS settings
- Domain verified in email service (e.g. Resend/SendGrid/Mailgun/AWS SES)
SPF Configuration
- SPF TXT record added to DNS
- Includes your email service (e.g.
include:secureservernet.com,include:amazonsesnet.com, etc.) - SPF record verified in email service dashboard
DKIM Configuration
- DKIM CNAME records added to DNS (usually 2-3 records)
- DKIM verified in email service dashboard
- Green checkmarks showing in email service
DMARC Configuration
- DMARC TXT record added to DNS (_dmarc subdomain)
- Policy set (start with p=none, move to p=quarantine then p=reject)
- Reporting email configured (rua=mailto:...)...this is for reporting, e.g. services like ValiMail. Add your email address if you want to receive the reporting
Testing
- Test email sent to Gmail. Lands in inbox
- Email headers show SPF: PASS, DKIM: PASS, DMARC: PASS
- Mail-Tester score: 9/10 or 10/10
- Tested with multiple email providers (Gmail, Outlook, Yahoo)
- No emails going to spam
App Configuration
- App sends from authenticated domain (support@yourapp.com and/or support@dispatch.yourapp.com)
- Reply-to email set correctly
- Proper email headers included
- Unsubscribe link added (for marketing emails)
Before deploying, verify ALL boxes are checked!
Wrapping Up
Email authentication (SPF, DKIM, DMARC) sounds intimidating, but it's really just a few steps and a max 24 hours wait for global DNS propagation.
This is the ONE thing Replit Agent (or other Vibe-Coding apps) can't do for you at this time. But it's also one of the easiest things to fix once you know the steps.
The result? Your app's emails actually reach your users. Password resets work. Email verifications arrive. Welcome emails land in the inbox. Marketing emails reach INBOXES, and your app looks professional.